

How To Change The Size Of A Video Clip In Premiere Pro
Some of the links in this article are "affiliate links", a link with a special tracking code. This ways if you click on an affiliate link and purchase the item, I volition receive an affiliate commission. The price of the item is the same whether it is an affiliate link or not. Regardless, nosotros only recommend products or services we believe will add together value to our readers. By using the affiliate links, you are helping support Edit Video Faster, and I genuinely appreciate your support.
This article is on how to simply scale and resize a video clip or image in Premiere Pro. You lot'll acquire how to scale your clips in a couple easy steps. You will also acquire how to keyframe the scale belongings and so you tin resize a video clip or image over time in Premiere Pro.
Quickly Scaling a Prune in Premiere
Step 1: Select Prune in Timeline
To begin, select the clip in the timeline that you desire to calibration or resize.
Stride ii: Scale Holding in Effect Controls Console
Side by side, navigate to the Effect Controls panel. If you cannot notice it, go under the Window carte and select Effect Controls. The panel should then popular upwards.

Now find the Scale holding. It's value is 100 by default. Click the value and drag your mouse to the left or right. Dragging to the left will make the value smaller, thus scaling the prune downwardly. If you drag to the right then the value and the clip volition get larger. Instead of click + dragging, you tin can click the value once and blazon in a new value and hit the render or enter key to submit the value.
Do y'all need stock music? Bank check my friends at Soundstripe. I believe they have the best selection, pricing, and licensing out in that location. For 10% off a subscription employ the code "EVF" at checkout. 🎧 (chapter link)
Yet another way to change the value of the scale belongings in Premiere Pro is by clicking the ">" next to Scale in the Effect Controls panel. This will open up up a slider y'all tin click and drag from 0 to 200. Note: you cannot calibration below nada (0) but yous can scale above 200. You can scale a clip upward to 10,000 in Premiere Pro (I believe) but honestly I can hardly imagine a situation when you'd want to exercise this.

Step three: Keyframe Scale Property
If you want to scale the prune over time then yous need to keyframe the Scale property. In the Upshot Controls panel, click the stopwatch icon next to Calibration. Move the time position indicator (the blue bar) to another point in the timeline or Effect Controls panel. Now back in the Effect Controls panel, prepare a new value for the Scale property.
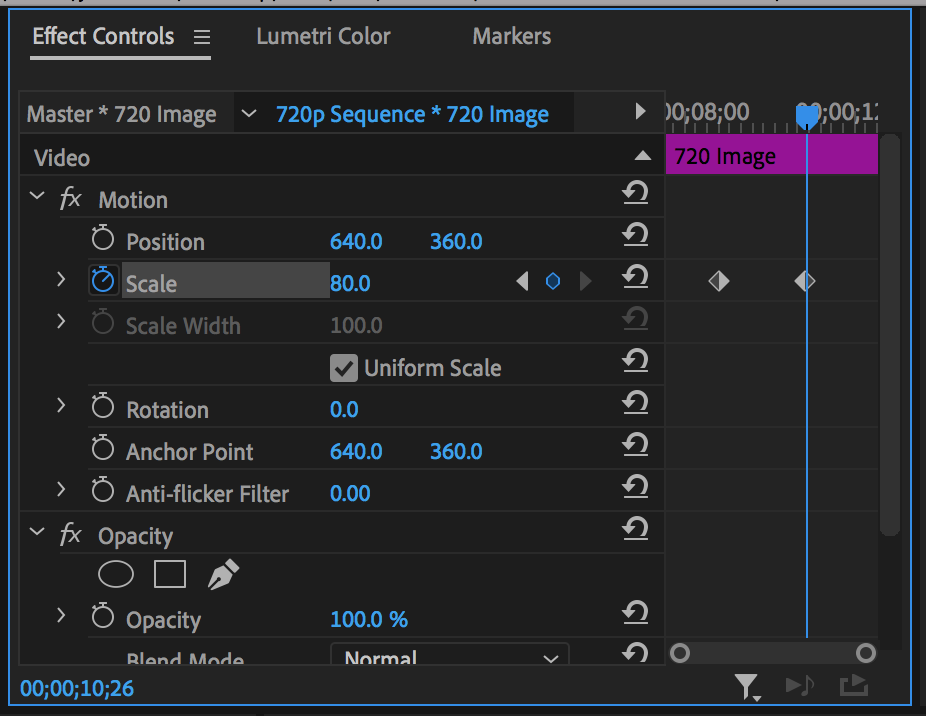
You can fix numerous keyframes if you want a clip to scale up, then down, so upward, or whatever the heck yous'd want to exercise.
Enjoying this tutorial? Cheque out my Crash Form in Editing in Premiere Pro. Learn all the basics for editing in PPro in 22 minutes!
Other Important Scale Tips to Know in Premiere Pro
Copy and Paste Scale onto Another Clip or Clips
You can copy and paste the scale property onto other clips. In the Effect Controls console, right-click the give-and-take Movement and click copy.
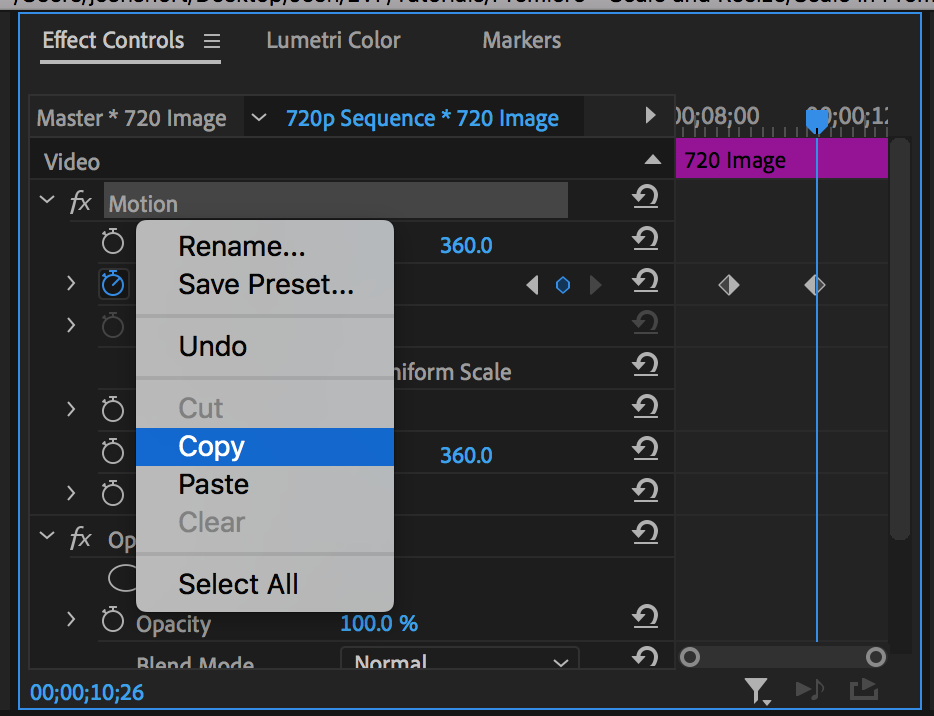
Now, select the prune or clips that you want to paste the scale holding to. Utilise the keyboard shortcut Command+V if y'all're on a Mac or Control+V if you're on a Windows computer. All the selected clips now have the scale property that y'all merely copied, including any keyframes!
Notation: You are copying and pasting all other Motion backdrop when you lot practice this. So if you lot copied a clip that yous scaled and rotated, you'll exist pasting the contradistinct rotation property onto the new clips as well.
Set to Frame Size vs. Scale to Frame Size
If you right-click on any clip in the timeline you'll find the Set up to Frame Size and Scale to Frame Size options that appear in the menu.
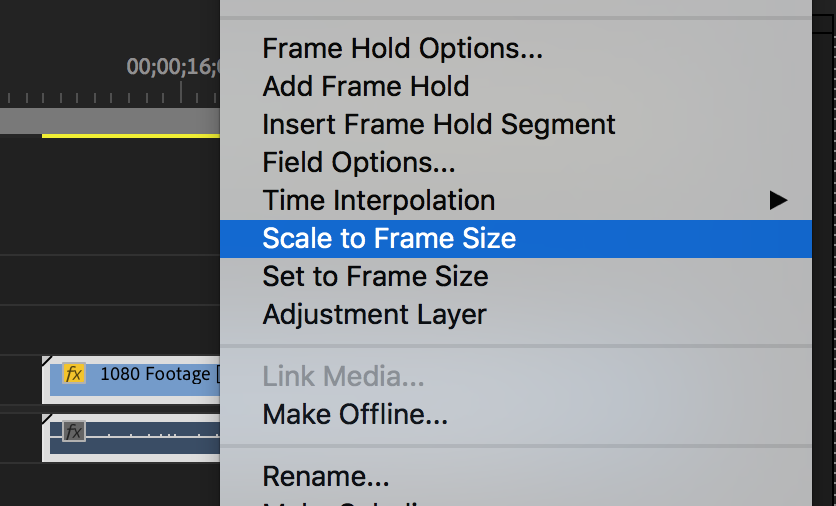
Selecting Set to Frame Size volition scale your clip upward or down to match the sequence. An example would be a 1920×1080 clip in a 1280×720 sequence. This clip would exist scaled downwards to a value of 66.7.
Scale to Frame Size volition not actually scale the clip. It'll change the prune and so that it is now 1280×720 in the sequence. The calibration remains at 100.
Set to Frame Size is meliorate to work with in my stance considering you are non losing pixel information. So if you need to scale upwards for whatever reason, the resulting scale will non leave your video clip or epitome pixelated.
Did you enjoy this tutorial on how to simply calibration and resize a video prune or image in Premiere Pro? If then, I'd beloved to keep in touch. All you take to exercise is go here to stay in the loop on new blog posts, tutorials, and announcements.
– Josh
Source: https://www.editvideofaster.com/scale-clip-premiere-pro/
Posted by: lenahannamushe83.blogspot.com
0 Response to "How To Change The Size Of A Video Clip In Premiere Pro"
Post a Comment